

How to Upload a Zoom Meeting to Panopto
Step 1: Record a Zoom Meeting
There are two ways to record a Zoom meeting:
- You can record locally to your computer
- You can record to the cloud
By default, your Western Zoom account will only let you record to your computer. In order to have the option to record a meeting to the cloud, you will need to create a ticket with WTS (Western's Technology Services) and request that function be added to your Zoom account.
Cloud recordings automatically upload your meeting to the internet, ready to be downloaded. These recordings are stored online for 7 days before being deleted.
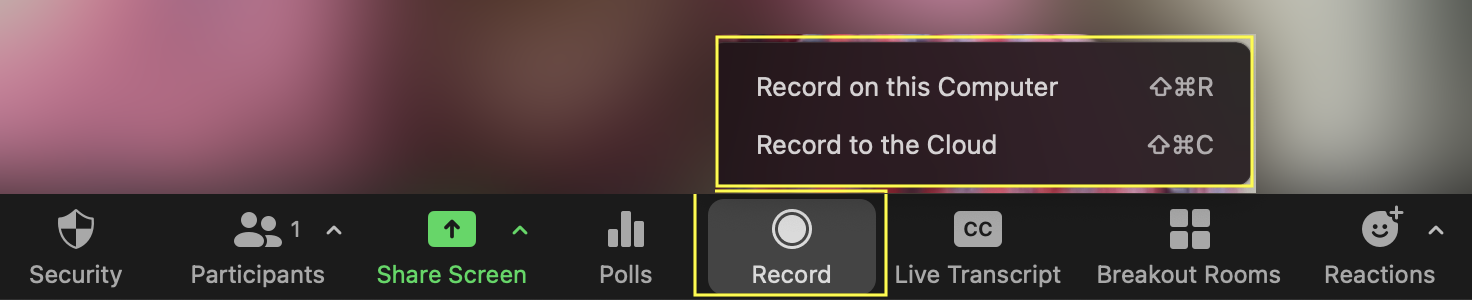
- If you are the Host of the meeting, or if the meeting permissions allow for the co-host or guest to record, you should see the record icon on your bottom bar.
- Click the record icon.
- Choose the type of recording you wish to use: locally to your computer or to the cloud.
- Press the pause icon when you want a break but don't want to stop the recording. For example: during breakout rooms.
- Press the stop icon when you've finished the meeting. Your recording will be processed and saved to your computer or automatically processed and uploaded to the cloud.

Step 2: Download a Zoom Meeting from the Cloud
If you've recorded locally to your computer, your video will be automatically converted and saved to a designated folder once you leave the meeting. A folder window will automatically open containing video and audio files.
If you've enabled and recorded to the cloud, your video will be automatically uploaded and processed online once you've left the meeting. When your video is complete, you'll receive an email with a link to your recorded meeting.

Download your video file from the cloud:
- Open the email from Zoom indicating that your meeting recording is now available.
- Within the email, click on "View Details." You will then need to log in using your Western credentials.
- Once logged in, you'll be taken to the Zoom cloud recordings page.
- Click on the "Download" button.
- An audio and video file will be downloaded directly to your computer within your designated download folder.
Step 3: Upload to Panopto
- In a web browser, go to ssmd.ca.panopto.com.
- You'll be directed to log in using your Western credentials, then taken to Panopto's home page.
- Select the purple "Create" button and then "Upload Media."
- At the top, be sure to select "My Folder" as the destination where you want your files.
- Find your video file, drag it to the upload media screen, or click "choose video and audio files" and find your file.
- Once uploaded, you can close the upload media screen and go to your "My Folder." This will take you to your newly uploaded videos. Depending on the length of the videos, it may take a few minutes for your uploads to be processed.
- Within your "My Folder," you'll want to add a name and description to your videos.
- Hover your mouse over the video thumbnail to edit your video, then select the "Edit" button.
- You can change the title and add a description within the edit page.
- Once completed, hit the exit icon at the top right or "Apply," depending on the changes you've made, and return to your "My Folder."
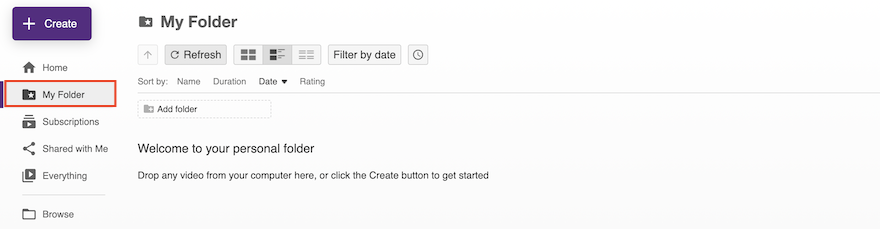
When uploading to Panopto, it is best practice to upload your media directly to your "My Folder." By default, your "My Folder" has permissions set to private, meaning anything within your "My Folders" can only be viewed by you. Once uploaded to your "My Folder," you can copy or move your videos into their designated course folder.
If you'd like to keep your video within your "My Folder" and still want to share a link or embed your video, you'll need to change the share permission on the individual video. Alternatively, you can create a subfolder within your "My Folder" and set the desired folder share permissions. Any video added to the subfolder will then inherit the new subfolder's permissions.


